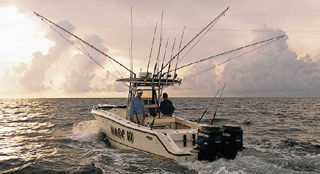
Creating a productive trolling spread that covers a wide swath of ocean is an ongoing challenge among serious offshore anglers, which is why outriggers and center riggers are de rigueur equipment on almost every blue-water boat. In fact, these days it's common to see even 21-foot center consoles adorned with a full array of T-top-mounted 'riggers. Although these trolling tools fill a vital role in offshore fishing, there's a good deal of confusion over how to rig them.
Poorly rigged outriggers can hinder the performance of baits and lures. In choppy seas, excessive slack in the outrigger halyards causes the baits or lures to surge erratically. This could also prevent the release clip from immediately opening after a strike.
Adding a second release clip to the same halyard sometimes compounds the problem, even if the halyard is taut. That's because the heavier bait or lure, or the one creating the most drag, can take some of the tension off the other release clip. In choppy seas, the clip with the least amount of tension could flip or twist just enough to foul the line it's holding, or might not open promptly on a strike. Lastly, if the outrigger's shock cord fastens above or to the rim of the T-top, as is the case on many small and mid-sized boats, the release clips may be hard to reach and adjust, especially in heavy seas. Fortunately, there's a solution.
Hot System
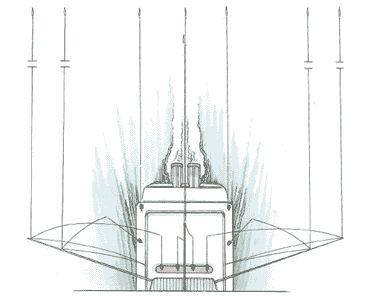
Thanks to an innovative and surprisingly simple way of rigging outriggers and center riggers, I can troll two baits off each outrigger, plus two more off the center rigger, on my 28-foot center console. Add in two flat lines, fished straight off the transom, and I can troll an eight-bait spread with plenty of separation to avoid tangles. That's double the number of baits trolled by many small and mid-sized boats. What's more, my halyards always remain taut, and I don't have to stretch or climb onto the gunwales to reach the release clips.
|
|
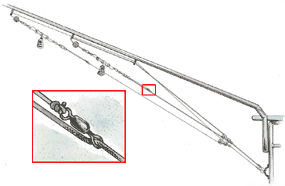
I learned about this system three years ago from a devoted big-game angler, and have been impressed with its performance ever since. I recently rigged the outriggers on my new boat the exact same way, with two release clips, each rigged on an independent halyard, per pole. Advantages of this system include the sliding halyard barrel swivel, which permits precise tension adjustments to keep the halyards taut in both the running and fishing positions. Once adjusted, the halyards rarely loosen up. In fact, on a recent trip to the Bahamas, not once did the sliding swivel slip during the crossings or while fishing.
Then there's the benefit of stringing each outrigger clip on its own adjustable halyard, which maintains the independent action of each bait or lure while eliminating the risk of improper release-clip operation or line fouling. Another major plus is that each outrigger's pulley/shock-cord fastener can be secured to a convenient spot on the rim of the T-top, or on one of its stanchions. This enables the release clips to be retrieved right into
the cockpit for easy loading.
Step one
The best halyard material for this application is 3/16-inch braided nylon cord, as it provides the 'grip' that enables the barrel swivel to hold its position. As for the amount of cord necessary to create each halyard, a good rule of thumb is to use twice the length of your pole. For example, with 15-foot outriggers, go with 30 feet of cord for each halyard. With your outriggers in either the running or fishing position, pass the cord through the lower outrigger guide first, then through the remaining eyes.
Step two
Once the cord exits the top outrigger guide, pass it through a cork float or small lure head, then tie it to a snap swivel. Attach the snap swivel to a release clip (I use AFTCO Roller Trollers). The float or lure head will act as a stop, preventing the snap swivel and release clip from jamming in the top guide. Strip off enough line from the top to work with, bringing the release clip down near the base of the outrigger pole. Excess cord can be trimmed as you complete the rigging.
Step three
At the base of the outrigger, pass the opposite end of the cord through the shock-cord pulley. Use a quality pulley, one that's large enough to easily accommodate the halyard cord. It pays to go with a large pulley, which will provide smooth and effortless release-clip retrieval.
Step four
After exiting the pulley, pass the halyard cord through the eye of a barrel swivel. For the maximum holding power, it's essential to use the smallest swivel that will fit on the cord. Any larger and slippage could be a problem.
Step five
After adding the barrel swivel, pass the line through the eye of a snap swivel, but do not tie it off. Next, clip the snap swivel to the release clip. Outside of adjusting the length of the outrigger line and tying it to the open eye of the barrel swivel, the rigging is basically complete.
Step six
Here are some critical adjustments to keep in mind: Keep the barrel swivel fairly close to the pulley/shock cord and within two or three feet of the release clip. Take up any slack by pulling the halyard through the eye of the snap swivel fastened to the release clip. You will likely have to cut off a few feet of line to eliminate the excess slack. Once the line is fairly taught, tighten it a little more. Make sure the barrel swivel is about two to three feet from the release clip, since this is where the extra slack will come from when needed, then tie the halyard to its open eye.
Providing the barrel swivel remains within a couple feet of the release clip during the adjustment process, the clip should come close enough to reach from the cockpit when retrieved. Also, the barrel swivel can pass through a large pulley should the clip need to be retrieved even closer.
To increase halyard tension, simply slide the barrel swivel toward the cockpit. To loosen it, slide the barrel swivel up the halyard, away from the cockpit. This applies when retrieving or deploying the outriggers.
Note: Follow this procedure when rigging each outrigger. When running two clips per outrigger, run the main halyard with the top release clip through all the outrigger guides. The halyard with the lower clip should exit through the second guide from the top. Each halyard should be rigged to an independent shock cord. Ditto with a center rigger. My lower outrigger clips, as well as both clips on my center rigger, are AFTCO Goldfinger release clips.
|


